To check the system’s performance, you may need to know the number of CPU threads running simultaneously.
To check CPU threads, open “Task Manager”, navigate to “Performance”, and click “CPU”. You will see the total number of CPU threads next to “Logical Processors”.
To make things easy for you, we have written a detailed step-by-step guide on how to check CPU threads through different methods.
What Are Threads in the CPU, and How Do They Work?
CPU threads are the virtual codes associated with the physical computer codes, such as cores, and work with them to execute various programs or applications simultaneously efficiently.
A single CPU core consists of two threads. In the same way, an octa-core CPU will have 16 threads. But these numbers in a processor also vary depending on the model and generation of a system.
When you open an application, the operating system creates a primary line, which takes the information or input from the user, creates a thread, and transfers commands to it simultaneously. Then, another thread gets created on the other command, and tasks are allocated onward by other threads and then executed.
Checking CPU Threads
If you are wondering how to check CPU threads, our following 5 step-by-step methods will help you go through the whole process quickly.
Method #1: Using the Task Manager
You can conveniently check the CPU threads using the Windows Task Manager in the following way.
- Press the Ctrl + Alt + Del keys simultaneously on the keyboard and click “Task Manager” from the pop-up window.
- Click “Performance”.
- Click “CPU”.
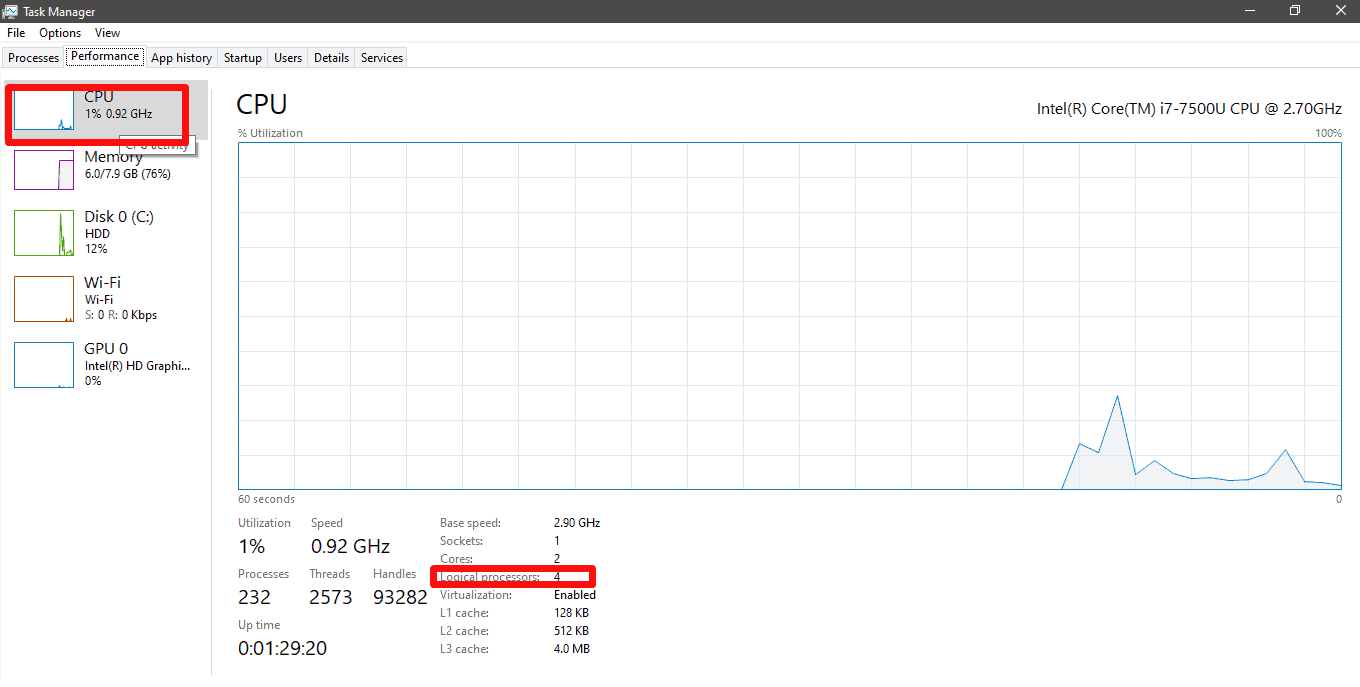
- You will see the total number of CPU threads next to “Logical Processors”.
Method #2: Using the Device Manager
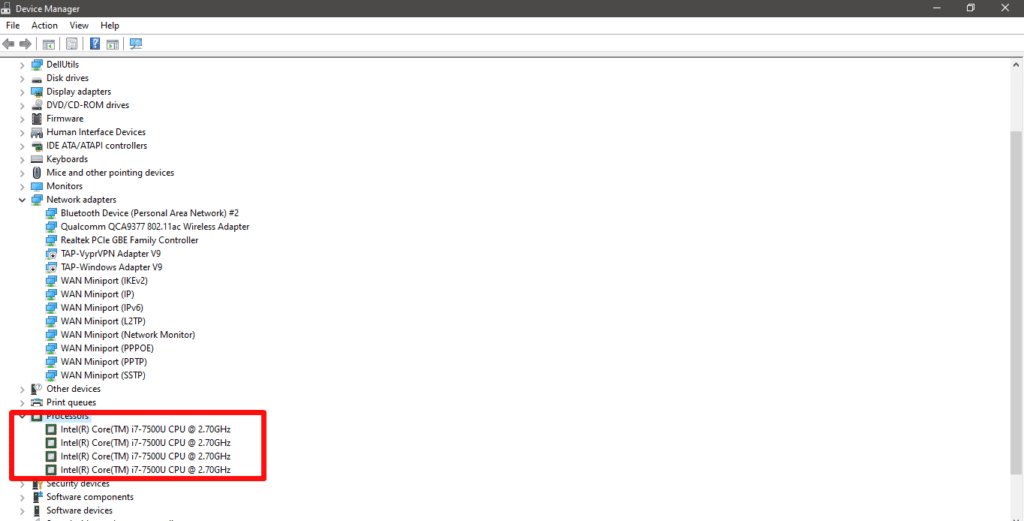
Following these steps, you can also get information about the CPU thread through the Device Manager.
- Click the Start menu.
- Click “Settings”.
- Click “Device”.
- Head to “Printers & scanners or Connected devices” and select the “Device Manager” option.
- Expand the “Processors” tab, and the number of CPU threads will appear.
Method #3: Checking the Windows System Information
It is possible to check CPU threads with the Windows System Information tab by doing the below steps.
- Search “System Information” on the search bar and click to open it.
- Locate “Processor” in the search menu at the bottom.
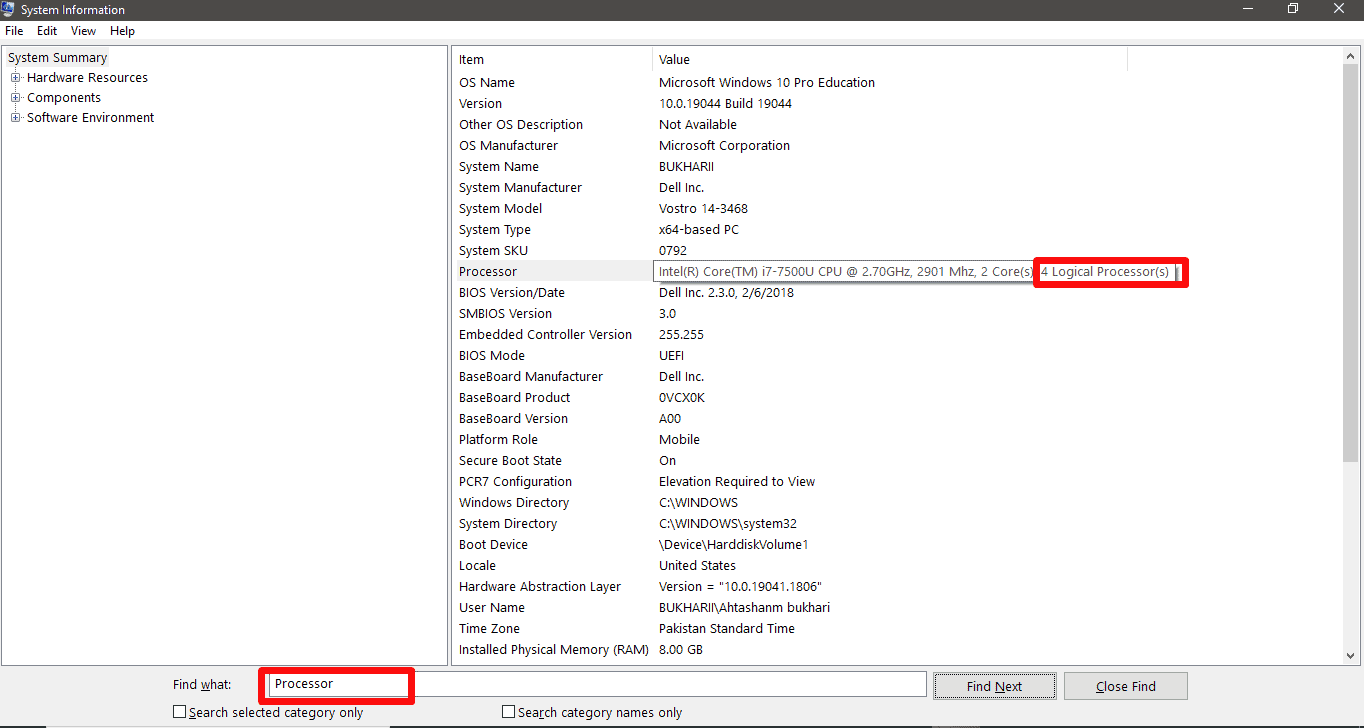
- Move the cursor above the “Processor” option in the right pane, and see the number of CPU threads installed on your system.
Method #4: Checking With Third-Party Software
Another quick way to check CPU threads is to use third-party software such as CPU-Z. After downloading and installing the software, it will reveal every detail about the system, including the CPU.
Although this software is usually geared towards advanced users, you can extract the required information with a little practice.
Method #5: Using Windows PowerShell
Windows PowerShell is a handy automation solution that you can use to check CPU threads in the following way.
- Press the keyboard shortcuts (Windows Key + X) and click “Windows Power Shell (Admin)” to open it from the menu.
- Type
WMIC CPU Get NumberOfCoresin the command line and hit Enter. - The number of CPU threads and cores will appear on the window.
From the number of cores, estimate the number of threads. For example, 2 core/4 threads.
Method #6: Using Command Prompts
You can also check CPU threads using the command prompt and the Windows Management Instrumentation in two ways.
Way #1: Using WMIC
- Press the Keyboard shortcuts (Windows Key + R), and the Run dialog box will open.
- Type
wmicand press “OK”. - Type
cpu get numberofLogicalProcessorsin the Windows Management Instrumentation command prompt. - Hit Enter, and the number of threads in the CPU will be displayed.
Way #2: Using Command Prompt
- Press the keyboard shortcuts (Windows Key+ S).
- Type
cmd. - Hit Enter.
- Type
wmic cpu get numberofLogical Processorin the Command Prompt, and the number of logical processors will show the CPU threads.
What Is Multithreading?
Usually, a single CPU core has at least a single thread. However, for better system performance, the number of virtual cores (threads) often exceeds the number of physical cores, referred to as Multithreading.
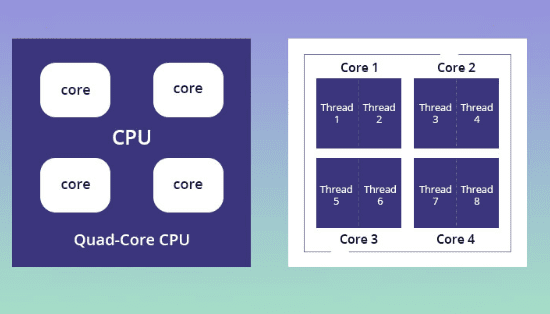
To check if multithreading is enabled on your system, press the Window + S keys on the keyboard to open the Command Prompt, type CPU get numberofcores, numberofLogicalProcessors /Format:List, and hit Enter. If the number of logical processors is the same as the number of cores, the CPU is not multithreaded.
Moreover, you can also enable or disable multithreading on your system. However, the more threads your CPU has, the better and faster it will run and execute multiple programs in parallel.
Summary
This comprehensive guide has discussed checking CPU threads using Task Manager, Device Manager, System Information, and other methods with easy instructions.
Hopefully, your query is resolved, and you can now easily check the performance of your processor and enhance it by looking at the information and closing the resource-hungry tasks on your computer.
Frequently Asked Questions
You can increase CPU threads by enabling hyper-threading. For this, go to System’s BIOS Settings by pressing the BIOS keyset given by the manufacturer and opening “Processor”. Next, click “Properties” and enable “Hyperthreading”. Save the changes made and then exit BIOS.


