TP-Link routers are one of the most common in the world. And, with the growing need for fast wireless and wired connections around your house/office, bridging routers together to get the highest amount of coverage makes a lot of space. This begs the question, how do you bridge your TP-Link router?
You can bridge your TP-Link router wirelessly using WDS (Wireless Distribution System) or by using a wired link and connecting two routers. In either case, the root router uses your ISPs internet connection as a source, while the second one uses your root router as the source instead.
This article will cover exactly how you can bridge two TP-Link routers, the nuances of the entire operation, and whether you should do so in the first place.
Wireless Bridging
Wireless bridging is called WDS, or a Wireless Distribution System. It allows your network to share its bandwidth to a larger area with multiple routers without needing a wired backbone connection.
In general, most TP-Link routers can be connected using WDS. However, that might not always be the case due to regional differences. To bridge your TP-Link router wirelessly, here’s what you need to do.
- Open your router’s default gateway and enter your username and admin password.
- Head to “Wireless”.
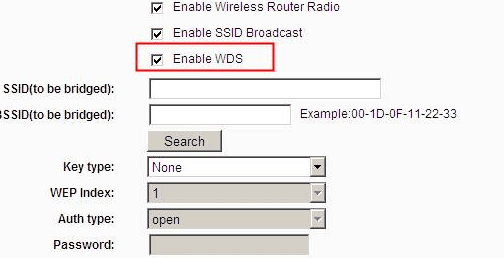
- Select “Wireless Settings” and also enable “WDS”.
- Hit “Apply” and let your router reboot.
- Head back to the WDS settings and type in the SSID of the device that you wish to connect to (wireless network name).
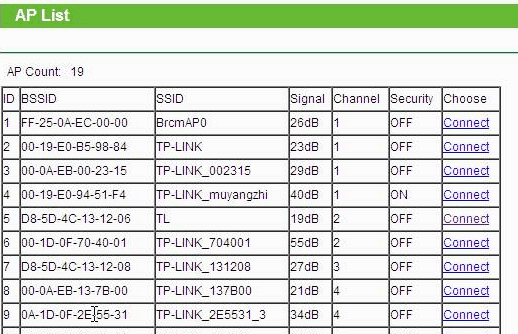
- You will now be able to see a list of router access points available for your device; click on one.
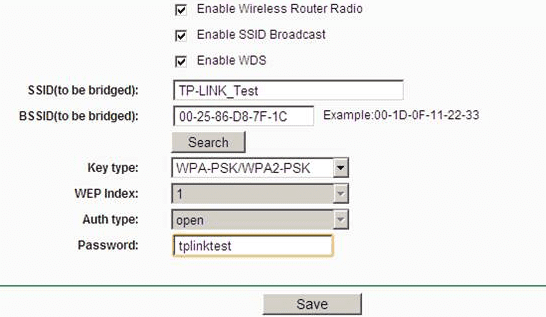
- Now, enter your root router’s password and select the same channel that you use on your root router.
Suppose your router cannot connect to the internet after following these steps. In that case, you’ll need to disable DHCP Server on your secondary router to get an internet connection back up and running.
After you’ve gone through all that, you have successfully bridged two wireless TP-Link routers together. However, you can always change your secondary router’s wireless network settings to be different than your original router.
Wired Bridging
Wired bridging is quite simple, considering it involves sending packets from your router to another. With wired bridging, you don’t need to worry about keeping your SSIDs intact or your primary router’s channel.
Here’s how you can set up a TP-Link router with wired bridging.
- Connect your secondary router to your primary router by connecting the main ethernet port to your primary router’s LAN 1/2/3 port.
- Connect your laptop/mobile to your secondary router.
- Head to your secondary router’s setup page, set the “Default Gateway” as the IP address of your primary router within the network, and place a unique IP address for your secondary router.
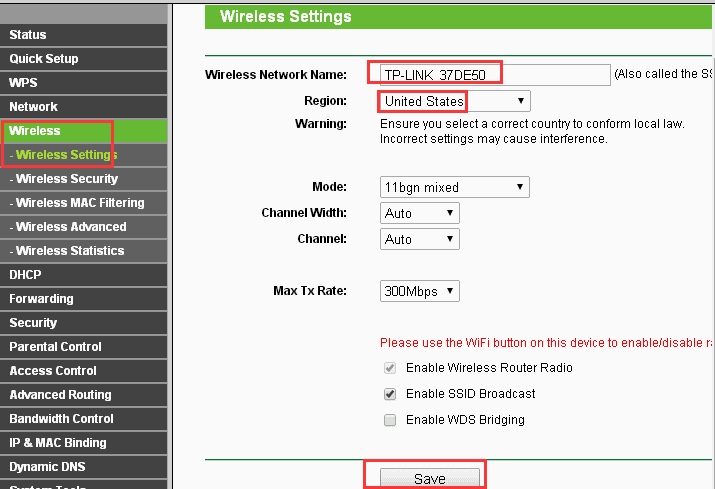
- Click on “Save”. Your router will reboot, and you’ll have internet access.
- To use a wireless connection on your secondary router, set your Wi-Fi connection as you would normally, and it should be operable.
If you cannot find the IP address of your primary or secondary router, you can open Command Prompt on your PC and type in ipconfig. After doing so, you’ll be able to see both the Default Gateway of your router alongside the IP address it uses.
Wireless vs. Wired Bridging: Which Is Better?
Wired bridging is much better than wired bridging. This is because wired bridging will always have less interference and lead to high bandwidth speeds. No matter how powerful, wireless networks can’t compete with a wired connection simply because of their bandwidth throughput.
You won’t notice the difference if you have a relatively slow internet connection (100 Mbps or lower). But, if you are planning to transfer files across both routers, you’ll quickly run into bottlenecks with a wireless connection.
One advantage of wireless bridging is you remain clutter-free. You can’t run a wire everywhere. And that’s where wireless bridging truly shines through. Moreover, a wire can quickly get extremely expensive if you run wireless networks off long distances.
Conclusion
Bridging your wireless connection gives you a quick and easy way to expand your wireless (or wired) network’s reach. However, you’ll have to keep your network speed in mind. Otherwise, you might end up bottlenecking your entire device cluster with a sub-par browsing experience simply due to spreading your resources too thin.


