The modern-day graphics cards have a unique thermal design that limits the card’s performance after reaching a specific temperature. High-end graphics cards come with customized software to make hardware changes. But what if you can’t change fan speeds with their software?
To change the GPU fan speed, you’ll need to install MSI Afterburner on your computer system. Run the Afterburner and click the settings icon on the middle-left side of the Control Panel. Next, find and click the “Fan” tab. Check the “Enable user-defined software automatic fan control” option, and you will be able to modify the fan curve to adjust the fan speed.
We took the time to write a comprehensive step-by-step guide on how to change GPU fan speed on your computer with easy instructions. But first, let’s look at the reasons for adjusting the GPU fan speed.
Reasons To Change the GPU Fan Speed
There are several practical reasons to change the GPU fan speed, as stated below.
- To maintain GPU temperatures for better performance.
- To increase the lifespan of GPU.
- To make GPU faster and keep its temperature under control.
- To change the speed to make it quieter.
Changing the GPU Fan Speed
Don’t know how to change GPU fan speed? Our 4 step-by-step methods will guide you through this process without any hassle.
Method #1: Changing the AMD GPU Fan Speed
AMD Radeon Wattman is exclusively designed to adjust and improve the performance of AMD GPUs and can be used to change the fan speed by following these steps.
- Download and install AMD Wattman on your system if it’s not pre-installed.
- Right-click the desktop and select the AMD Radeon Settings.
- Navigate to the “Gaming” tab and click “Global Settings”.
- Click “Global Wattman” and set the Speed/Temperature as “Manual” from the bottom-left corner.
- Click to drag dots on the graph to adjust the fan speed with the corresponding temperature.
- After adjusting the slider, click “Apply” to save the settings. You can also build custom profiles to save and change different settings.

You can select “Zero RPM Mode” to reduce the fan noise if running any heavy application on your computer system.
Method #2: Changing the Nvidia GPU Fan Speed
The Nvidia Control Panel is a dedicated software designed to change Nvidia GPUs’ performance, allowing you to adjust the fan speed by following these steps.
- Download and install the Nvidia Control Panel on your computer system.
- Right-click the desktop and select the Nvidia Control Panel from the menu.
- Navigate to the “Performance” tab and click the “Device Settings”.
- Select the “Manual Control” option under the “Cooling” section.
- Adjust the slider next to “GeForce GPU” to increase the fan speed and click “Apply” to save.
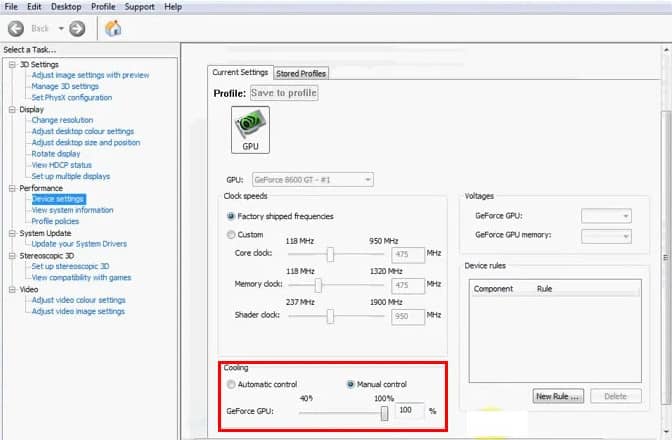
If your Nvidia Control Panel version does not have the cooling slider option, you can download the manufacturer software or third-party software to adjust the fan speed.
Method #3: Changing the Fan Speed With MSI Afterburner
If you can’t find the proper manufacturer’s software to adjust the fan speed of your GPU, you can use third-party software to get this done.
- Download and install MSI Afterburner for the computer system.
- Run the application and click the settings icon.
- Navigate to the “Fan” tab and tick the “Enable user-defined software automatic fan control”.
- Click and drag the dots on the graph to adjust the fan speed percentage.
- Click “Apply” to save and implement the fan speed settings.
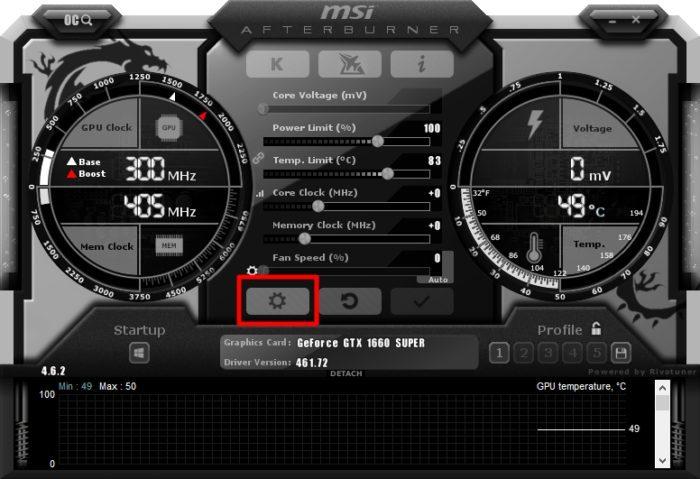
After applying the fan speed settings, navigate to the “General” tab and check to mark the “Start with Windows” so these settings initiate automatically on every startup.
Method #4: Changing the Fan Speed With EVGA
EVGA is a graphics card manufacturer that provides specific software for AMD and Nvidia EVGA GPUs, which can help adjust the fan speed by following these easy steps.
- Download and install EVGA Precision X1 for your GPU.
- Run the EVGA Precision software on your system.
- Click the auto icon to switch off automatic fan controls and access the “Fan Speeds” section.
- Adjust the sliders to modify the speed of each fan.
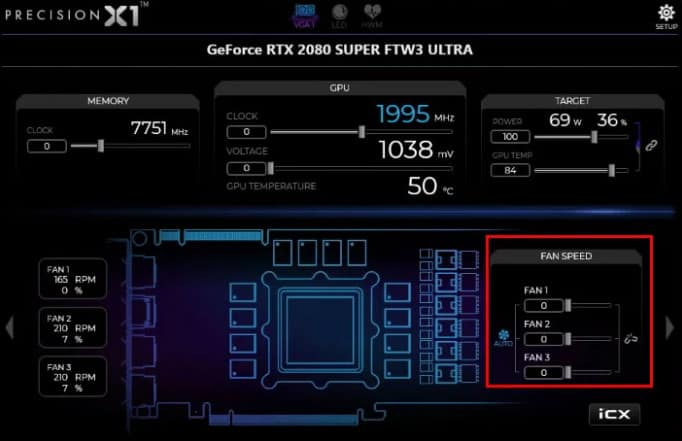
EVGA Precision X1 only works for GPUs manufactured by EVGA since it’s a vendor for Nvidia and AMD. Other vendors like Gigabyte, Asus, Sapphire, or Zotac have their performance tweaking software.
Summary
In this guide on changing GPU fan speed, we’ve discussed the reasons for adjusting the fan speed and performing this task via the customized manufacturer and third-party software.
Hopefully, you can now change the fan speed of your GPU without much effort and get the best performance out of your system and applications.
Frequently Asked Questions
It is beneficial to adjust the fan speed of your GPU to keep its temperature under control. This helps to increase the graphics card performance, maintain durability, and prevent the GPU from crashing while performing heavy tasks.
The maximum temperature for new-age graphics processing units is 100 Celsius (212 Fahrenheit). Some AMD GPUs can bear up to 110 Celsius temperatures under 100% load. However, the environmental conditions can also affect the GPU temperature despite its workload.
Yes, just like the CPU, the GPUs have their processing unit under the heat sync, which uses thermal paste to absorb the heat released from the unit. It is wise to seek professional help to change the thermal paste on your GPU if you notice severe symptoms of GPU overheating.
Like any other materialistic product, thermal pastes have expiration dates and last for 3 to 5 years under optimal conditions. It’s recommended to seek professional help before changing the thermal paste on GPU, as doing this on your own may damage the fans or the card.
Using third-party GPU controlling applications like MSI Afterburner is recommended if you have multiple GPUs in your computer system. If the software cannot detect your GPU, use the software provided by your vendor.
