Short answer
Two things decide how a print turns out: its shape and its pixels. Most phone photos are 4:3, but a 4 × 6 print is 3:2, so about 11% of the photo gets cut off. Crop it yourself first, or ask for white edges. For the pixels, divide them by the inches: 300 per inch is the usual mark for a print you hold in your hand. An original phone photo usually has enough for an 8 × 10.
The drawing shows what each print size keeps of a 4:3 phone photo when the photo fills the paper, to scale. On a 4 × 6, the tall person’s head touches the edge.
- Your phone photo, 4:3. The whole picture.
- 4 × 6 inches (10 × 15 cm): about 11% is cut off.
- 5 × 7 inches: about 5% is cut off.
- 8 × 10 inches: about 6% is cut off, from the sides this time.
- A4 (and A5): about 6% is cut off.
- Square: a quarter of the photo is cut off.
1. Know the shape of your print
Every print size has a shape: its long side divided by its short side. A photo only fills a print without losing anything if both have the same shape. Most phones take 4:3 photos. Most bigger cameras take 3:2. A 4 × 6 print is 3:2, from the days of film.
| Print size | A 4:3 phone photo loses | Size | Shape |
|---|---|---|---|
| 4 × 6 (6 × 4 in the UK) | 11% | 4 × 6 in (10.2 × 15.2 cm) | 3:2 |
| 10 × 15 cm | 11% | 10 × 15 cm (3.9 × 5.9 in) | 3:2 |
| 4 × 5.3 | Nothing | 4 × 5.3 in (10.2 × 13.5 cm) | 4:3 |
| 5 × 7 | 5% | 5 × 7 in (12.7 × 17.8 cm) | 7:5 |
| 13 × 18 cm | 4% | 13 × 18 cm (5.1 × 7.1 in) | 18:13 |
| 8 × 10 | 6% | 8 × 10 in (20.3 × 25.4 cm) | 5:4 |
| A5 | 6% | 148 × 210 mm (5.8 × 8.3 in) | about 1.41:1 |
| A4 | 6% | 210 × 297 mm (8.3 × 11.7 in) | about 1.41:1 |
| US Letter | 3% | 8.5 × 11 in (21.6 × 27.9 cm) | about 1.29:1 |
| Square | 25% | 8 × 8 in (20.3 × 20.3 cm) | 1:1 |
A4 and A5 have the same shape: the A sizes in the ISO 216 standard halve into each other. Walgreens and Snapfish also sell a 4 × 5.3 print, made for the shape of phone photos. Snapfish calls it True Digital and charges the same as a 4 × 6. A wide 16:9 phone photo loses about 16% on a 4 × 6, and a square photo a third.
2. Choose: cut the edges or add white edges
When the shapes differ, there are only two honest ways. The photo fills the paper and its edges are cut off. Or the whole photo fits, and the paper keeps white edges on two sides. Stretching the photo would squash faces, so good tools never do it.
- Fill the paper. The print has no white edges.
- The top and bottom of the photo are cut off: 11% in all. Snapfish shows its 4 × 6 prints cut like this. Crop the photo yourself to choose what goes.
- Fit the whole photo. Nobody gets cut off.
- White edges, about 8 mm (a third of an inch) on each side on a 4 × 6. Trim them off and the print becomes about 4 × 5.3, too small for a 4 × 6 frame. A mat with the right window can cover them.
Fill or fit: the same 4:3 photo on a 4 × 6. Choose what matters more, the whole paper or the whole photo.
Cut the edges
Fills the paper
Best for prints in a frame or an album. Crop the photo yourself first, so you choose what goes. Leave a little room above heads.
Add white edges
Keeps the whole photo
Best when people stand near the edges, such as a group photo. The edges are paper: you can trim them, or hide them under a mat.
Pick a print with your photo's shape
Nothing to choose
A 4 × 5.3 print takes a phone photo whole. A 4 × 6 or 8 × 12 takes a camera photo whole.
A panorama loses half or more if it fills a normal print: choose white edges, or a lab’s panoramic size. Photo labs make this choice for you unless you make it. Boots, for example, trims its fixed-width prints to 2:3, and keeps your photo’s shape on its variable-width prints. Walgreens says all its prints are borderless.
3. Check you have enough pixels
A photo is a grid of pixels, such as 4032 × 3024. A print size only says how far apart they go on paper. Divide the pixels by the inches, and you get pixels per inch. Adobe puts it the same way: physical size is the pixels divided by the resolution.
Pick a photo and a print below, or choose your own photo: it stays on your device. The calculator turns the paper to match your photo, as labs do. It shows how sharp the print can be, what is cut off, and the size to resize to.
The phones in the list are examples. A phone can also save smaller photos, and a shared copy is often smaller still.
Your photo stays on your device. The page only reads its size and shows it here.
Your print, 6 in by 4 in. The orange line is the paper's edge; anything outside it is cut off.
- At this size
- 672 pixels per inch
- Resize to
- 1,800 × 1,200 pixels
Plenty of pixels. 300 per inch is the usual mark for the best print quality, even held in your hand.
About 11% of your photo is cut off, half at the top and half at the bottom.
That is 300 pixels per inch. In the image resizer, choose Width and height, type 1800 and 1200, turn Keep the shape off, and choose Cut off the edges.
Open the image resizerWhat the numbers mean, with their sources:
| Pixels per inch | What to expect | Source |
|---|---|---|
| 300 or more | The usual mark for the best quality | Adobe |
| 200 to 300 | Prints looked at from less than 2 feet (60 cm) | HP |
| 150 to 200 | Prints seen from 3 to 5 feet (1 to 1.5 m) | HP |
| 100 to 150 | Posters seen from 5 to 10 feet (1.5 to 3 m) | HP |
| About 90 | The Walgreens minimum: 540 × 360 pixels for a 4 × 6, 900 × 720 for an 8 × 10 | Walgreens |
Pixels per inch alone don’t promise a sharp print. How far away you look matters: HP says the eye can’t see fine detail from farther away, so you need fewer pixels. A blurry or shaky photo also stays blurry at any size.
The pixels for 300 per inch, and what a 12 MP phone photo (4032 × 3024) gives:
| Print size | Pixels for 300 per inch | A 12 MP photo gives, with Cut the edges |
|---|---|---|
| 4 × 6 in | 1200 × 1800 | 672 per inch |
| 5 × 7 in | 1500 × 2100 | 576 per inch |
| 8 × 10 in | 2400 × 3000 | 378 per inch |
| A5 | 1748 × 2480 | 487 per inch |
| A4 | 2480 × 3508 | 344 per inch |
| 11 × 14 in | 3300 × 4200 | 274 per inch |
| A3 | 3508 × 4961 | 243 per inch |
For a print on a wall, 150 per inch needs half as many pixels each way. Shutterfly suggests at least 3 megapixels for standard prints. So a phone photo has room to spare up to about A4. A photo saved from social media or a chat app is often much smaller: Snapfish says Facebook photos suit a 4 × 6, not a poster. Print the original from your phone or camera when you can.
4. Get the photo ready with the image resizer
Do this when you want to choose what is cut off, or want white edges. The image resizer makes a copy in your print’s shape, with the pixels from the calculator. Your photo stays on your device. You still choose the print size when you order or print.
- Press Choose photos and pick your photo.
- Under New size, choose Width and height.
- Type the calculator’s first number under Width and its second under Height, such as 1800 and 1200 for a 4 × 6. The calculator already allows for photos taken upright.
- Turn Keep the shape off.
- Under If the shape is different, choose Cut off the edges or Add white edges.
- With Cut off the edges, drag the frame over the part to keep. The Left, Right, Up and Down buttons move it too.
- Press Resize photo, then Save.
- Print the saved copy, or upload it to the photo shop. Choose the same print size there, and check the preview before you pay.
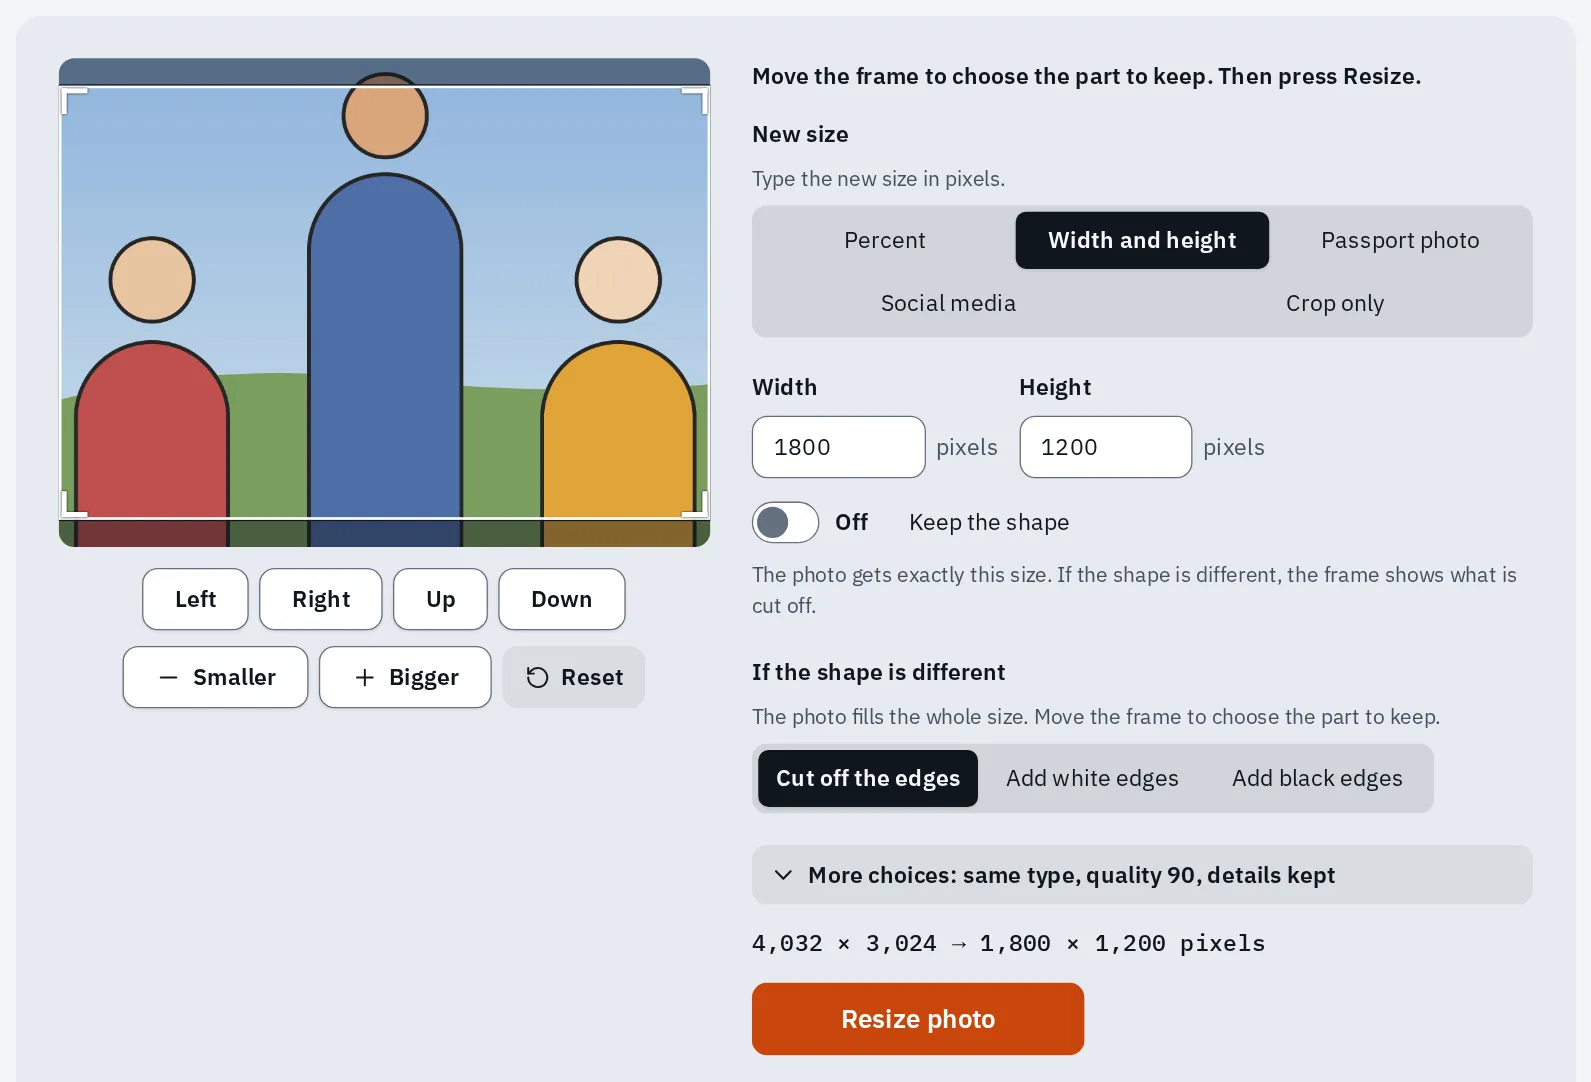
Our image resizer getting a 4:3 photo ready for a 4 × 6 print. The dimmed strips at the top and bottom are the part that is cut off.
Test it now
Image resizer
It shows your photo’s own pixels before you resize, so you can check them in the calculator above.
On an iPhone, the Photos app can crop to a print shape too. Tap Edit, then the crop button, then the aspect ratio button, and choose a shape such as 5:7. If your print’s shape isn’t in the list, use the image resizer.
5. Print it at home
Two settings cause most bad home prints: the paper size, and how the photo fits the page. Set the paper size to the paper in the tray, such as 4 × 6 in or A4. Then set the paper type to your photo paper, such as glossy photo paper, and choose the best quality.
Windows
- Open the photo and press Ctrl P.
- Choose your printer, then the paper size that’s in the tray.
- Look for the setting that says how the photo fits the page. Filling the page cuts the edges. Fitting the photo keeps it whole, with white edges.
- Open the printer’s own settings from the print window to choose the paper type and quality.
The names differ between apps and printers. If you made the photo the shape of the paper first, nothing important is cut. Margins and borderless printing can still change the edges a little, so check the preview.
Mac
- In Photos, select the photo and choose File Print.
- Select a format: a standard size, or Custom to set your own size.
- Choose your printer and its settings, such as the paper size and type, then click Print.
In Preview, the print window has Scale to Fit. Then choose Print Entire Image to keep the whole photo, or Fill Entire Paper to cut it to the paper’s shape.
iPhone and iPad
- Open the photo in Photos, tap the Share button, then Print.
- Choose your printer (it must be an AirPrint printer) and the number of copies.
- Tap Print.
The iPhone’s print window has few choices for how a photo fits. So crop the photo to your print’s shape first (section 4), then print it.
Test it now
Printer test page
Print it at 100% or Actual size. Its ruler should measure exactly 100 mm. If it’s shorter, your print settings shrink the page to fit.
Borderless prints lose a thin strip
To print without white edges, a printer spreads the photo a little past the paper’s edges. Canon says the part that goes past the paper isn’t printed. So a thin strip of the photo is lost on every side, even when the shapes match.
- The edge of the paper.
- The part of the photo printed past the edge. It doesn’t reach the paper.
- With the smallest expansion, or with a border, the whole photo prints. Epson says a small white edge may show.
Borderless printing, drawn bigger than real so you can see it. The strip past the paper's edge is lost.
Many Epson and Canon printers let you change how far the photo spreads. Epson’s Min keeps the whole image but may leave a small white edge; Max makes sure there are no white edges, but the photo’s own edges may not print. Canon’s slider is called Amount of Extension: Canon says moving it to the right spreads the photo further past the paper. Keep faces and text away from the edges, whichever you choose.
6. Fit it in a frame
A frame’s size names the photo it holds: a 5 × 7 frame takes a 5 × 7 print. With a mat (the card border inside the glass), a bigger frame holds a smaller photo. An 8 × 10 frame with a mat for 5 × 7, for example.
The frame’s lip or the mat’s window always covers a little of the photo. FrameAMO gives a 4.5 × 6.5 inch window for a 5 × 7 photo. That hides about a quarter inch (6 mm) on every side. So keep heads and words a little away from the edges.
- Measure the frame’s window, or the mat’s opening, before you print.
- Choose the print size the frame is for, not the window’s size.
- In the calculator, pick that print size and Cut the edges. Then leave a little room around faces when you place the frame in the image resizer.
No tape measure? The online ruler measures at real size on your screen, once you set it up with a bank card.
Questions people ask
How many pixels do I need for a 4 × 6 print?
1200 × 1800 pixels gives 300 pixels per inch, the usual mark for the best quality. Walgreens recommends at least 540 × 360. A 12 MP phone photo has far more than both.
How big can I print my phone photo?
Divide its pixels by 300 for a print you hold, or by 150 for one on a wall. A 12 MP photo (4032 × 3024) gives about 13 × 10 inches at 300 per inch. A 24 MP photo (5712 × 4284) gives about 19 × 14 inches.
Does changing the DPI to 300 make a photo sharper?
No. Adobe says resolution doesn’t change the image data, only how it maps to inches. The pixels the camera took decide the detail.
Can I make a small photo bigger so it prints sharper?
No. Adobe says making a photo bigger in pixels can’t add detail that wasn’t there. It only spreads the same detail over more pixels. Print it smaller, or find the original.
Why did my 4 × 6 prints cut off heads?
Your phone photo is 4:3 and a 4 × 6 is 3:2, so the lab cut about 11% to fill the print. Snapfish says the top and bottom are lost on a wide photo, and the sides on an upright one. Crop it yourself first, ask for white edges, or order 4 × 5.3 prints.
Can I make a passport photo this way?
Use the Passport photo choice in the image resizer instead: it has the sizes for several countries. Check the official rules for your passport too.
Can I print an iPhone HEIC photo?
Many print shops and printers want JPG. Turn it into one with the HEIC to JPG converter. What is a HEIC file? explains the format, and JPG vs PNG which format to print.
The print shop says my file is too big to upload. What do I do?
Resize it to the pixels for your print size first: 1200 × 1800 is plenty for a 4 × 6. If a form asks for a size in KB, use the image compressor.