Short answer
Three free changes do most of the work. Face the light: a window or lamp in front of you, never behind you. Raise the camera to eye level, about an arm’s length away. Bring the microphone close: a headset or earbuds near your mouth beat a laptop’s microphone across the desk. A grainy or blurry picture is usually too little light, not too few megapixels: add light first.
What’s wrong with your picture or sound?
Try it: what your camera sees
Choose where the light comes from and where the camera is. The picture shows what the other person sees. Then turn on the lamp.
What the other person sees
Needs a fix
- Your face is dark and the window is bright. The camera sets itself for the bright window. Turn around, or close the curtain.
- They look up at you: your chin, your nostrils and the ceiling. Raise the camera to eye level.
| Where the light is | What the camera shows | The fix |
|---|---|---|
| Window behind you | A dark face against a bright window | Turn around, or close the curtain |
| Window or lamp in front | A bright, even face | Nothing to fix |
| Light from one side | Half of your face in shadow | A lamp or white screen in front |
| Only a ceiling light | Shadows under your eyes and nose | A lamp in front; the ceiling light off |
| Dim room | A grainy, soft picture | More light, before a new camera |
Put the light in front of you
- A window behind you: the camera looks straight into the bright window.
- The camera sets one brightness for the whole picture. It sets it for the window, so your face goes dark.
- A window in front of you, behind the screen or to one side of it.
- The light falls on your face, and the camera sees you clearly.
Same room, same laptop. Only the window changed sides.
Your camera sets one brightness for the whole picture. If a window shows behind you, it turns the picture down to suit the window. Your face then turns into a dark shape. Camera makers call this a silhouette. Logitech, Zoom and Microsoft give the same advice: the light should be in front of you, not behind you.
- Face the window. Turn your desk or chair so the window is behind your screen, or to one side of it. If a window must stay behind you, close the curtains or blinds.
- No window? Put a desk lamp behind or next to your screen, a little above your eyes, shining at you. A lampshade, or light bounced off a pale wall, is softer than a bare bulb.
- Switch off the light right above you if it leaves shadows under your eyes. Keep a lamp in front instead.
- Use a spare screen as a soft light. Open the white screen on a tablet, phone or second monitor next to your camera. Turn its brightness up and choose Warm white, which looks like a lamp.
- Check at the time of the call. Daylight changes through the day. A window that’s fine in the morning can glare in the afternoon.
Grainy or blurry? Add light first
A grainy, soft picture is usually a light problem, and a new camera rarely fixes it. In dim light, a camera does up to three things to make the picture bright enough:
- It turns up the gain. Gain turns the picture up, like a volume knob. The random specks get turned up too: that is the grain (Axis).
- It keeps each picture open longer. A slower shutter collects more light, but anything that moves blurs. Many webcams also send fewer pictures a second, so movement looks jerky.
- It smooths away the grain. Noise reduction works, but a strong one also wipes out fine detail (Panasonic). Hair and skin look smeared.
More megapixels don’t help with any of this: a 4K camera in a dim room still has too little light. Call apps also send much smaller pictures than a 4K camera makes. Zoom’s HD setting, for example, sends 720p or 1080p, depending on your plan. A sharp 720p picture in good light looks better than a dark 1080p one.
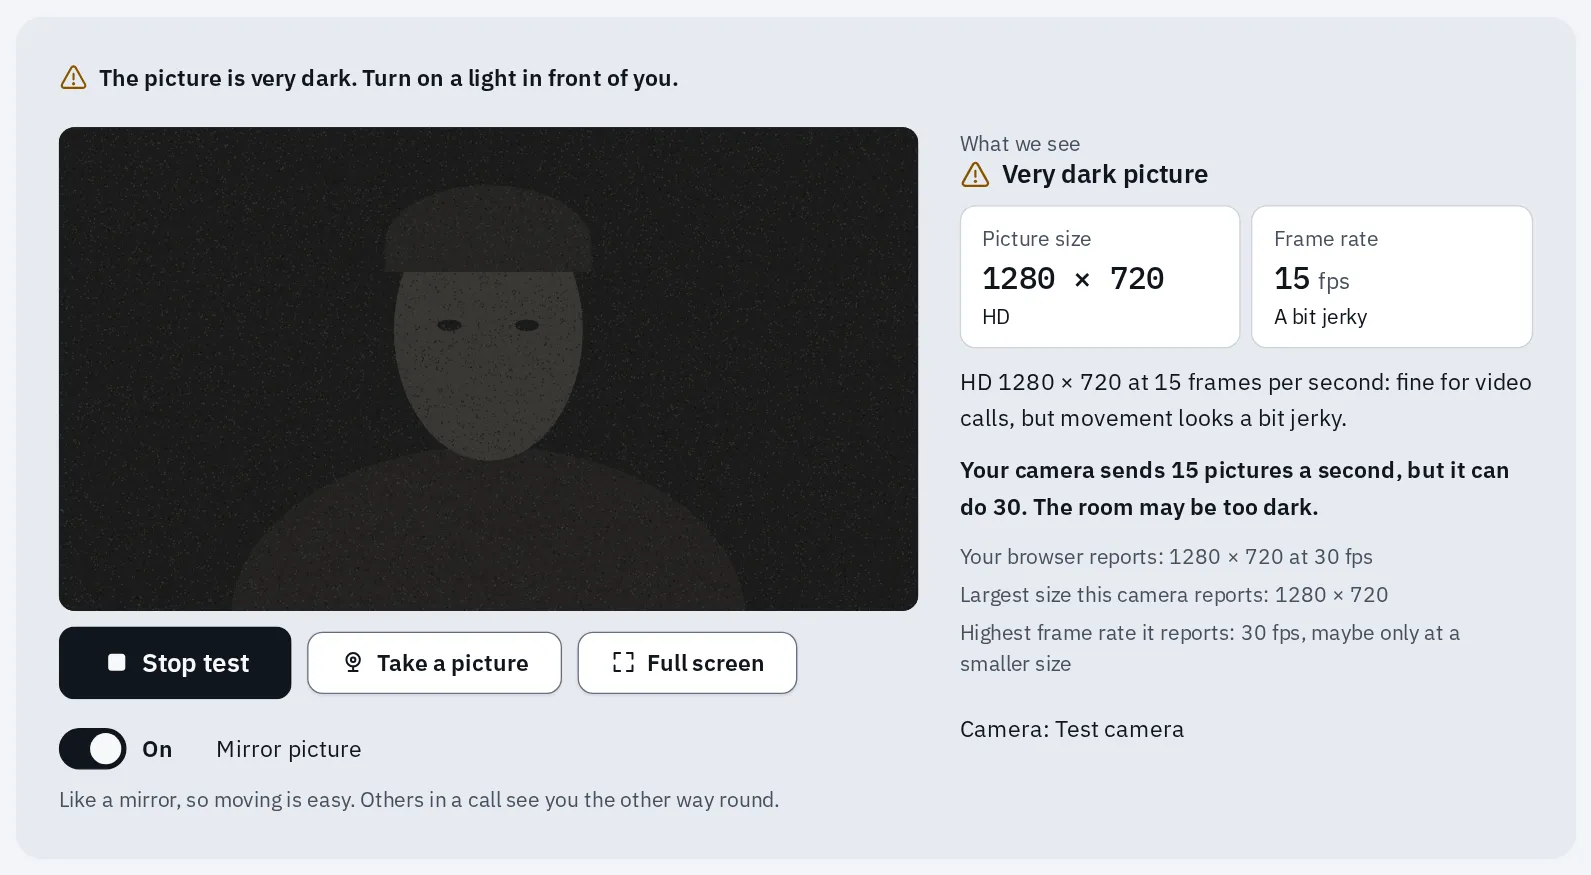
Our webcam test with a dim test picture: it warns about the dark picture and the low frame rate.
Test it now
Webcam test
Turn on a light in front of you while the test runs. If the frame rate goes up and the warning goes away, light was the problem, not your camera.
Still soft in good light? Then look at these, most likely first:
- A dirty lens. Wipe it gently with a soft, dry cloth. Laptop lenses collect fingerprints.
- Too close. Many webcams can’t focus on things very close to them. Sit back a little.
- A slow connection. Call apps lower the picture quality when the internet is slow. The video call test shows if that’s the cause.
- The camera itself. The camera resolution test shows the largest picture your camera really sends. Some webcams send a smaller picture than the box says.
Raise the camera to eye level
- A laptop on the desk puts the camera below your eyes.
- It looks up: the others see your chin, your nostrils and the ceiling.
- A few books or a box under the laptop bring the camera up to your eyes.
- Sit about an arm’s length from the camera. Your head and shoulders fit in the picture.
A laptop on a desk looks up at you. A few books fix it.
When the camera is at eye level, the others see you as if you sat across a table. Zoom, Microsoft and Logitech all give the same advice. Logitech adds “about arm’s length away” to fit your head and shoulders.
Laptop
- Put the laptop on a stack of books, a box or a laptop stand. Stop when the camera, at the top of the screen, is level with your eyes.
- Tilt the screen until your head and shoulders show in the middle of the picture.
- Sit back to about an arm’s length from the screen.
Typing on a raised laptop is awkward. For long calls, a separate keyboard and mouse help.
Computer with a monitor
- Clip the webcam on top of the monitor, in the middle.
- Raise the monitor until the camera is level with your eyes. Use its stand, or put books under it.
- Sit back to about an arm’s length from the camera.
Two monitors? Put the camera on the one you look at during the call, or the others see you looking away.
Phone or tablet
- Stand the phone or tablet up. Use a stand, or lean it against books, so it doesn’t shake.
- Turn it sideways (landscape), so the others see more than your face.
- Raise it until the front camera is level with your eyes, about an arm’s length away.
A phone held low in your hand is the worst case. It looks up at you and shakes as you move.
When you speak, look at the camera now and then, not only at the faces on the screen. That is where the others see your eyes.
Bring the microphone closer
- A headset microphone, about 2 cm from your mouth.
- A desk microphone, about 15 to 30 cm away and pointed at your mouth.
- A laptop microphone, as far away as the screen.
- Your voice at each microphone (orange) and the room’s echo and hum (grey). The closer the microphone, the more of you and the less of the room.
Your voice gets quieter with every step away. The room's echo and hum don't.
dB (decibel) measures loudness, and 6 dB less is clearly quieter. Each time the distance between your mouth and the microphone doubles, your voice reaches it about 6 dB quieter. The room’s echo and its general background sound stay about the same wherever the microphone is (Shure). So moving the same microphone closer makes you clearer, without turning anything up.
Headset with a microphone arm
About 2 cm from your mouth, as Jabra's manual says
The best choice in a noisy or echoey room.
Earbuds or AirPods
Their microphone sits in the stem or the cable
Bluetooth ones can sound thin on calls.
Desk or USB microphone
15 to 30 cm, pointed at your mouth (Shure, RØDE)
Much closer can sound boomy; further picks up the room.
Laptop, tablet or phone
As far away as the screen
Fine in a quiet, furnished room. Can’t wear a headset? A desk microphone is next best.
- Wear a headset or earbuds with a microphone, if the room is noisy or echoey. They also stop the others’ voices coming back through your speakers.
- Choose it in the call app. In the app’s audio settings, pick the headset as the microphone. Otherwise the app may still use the laptop’s own.
- Point a desk microphone at your mouth, about a hand’s span away (15 to 30 cm).
- Pick a soft room. Carpets, curtains, a sofa and bookshelves soak up echo. A bare kitchen or a hallway rings (RØDE).
- Turn off what hums: a fan, the TV, music. Close the window if traffic is loud.
Test it now
Microphone quality test
Make one recording where you sit now. Then move the microphone closer and record again under Compare two takes. Voice above the noise should go up.
Recording a relative’s story rather than a call? The same rules apply: see set up the room and the phone.
Settings in call apps that help
Call apps can brighten a dark picture and lower background noise. Brightening in software also brightens the grain, so real light still works best. Use these as extra help. Noise removal also cuts music: for an instrument, use music mode instead.
Zoom
On a computer, click your profile picture, then Settings.
- Video & effects Camera: turn on Adjust for low light. It starts on Auto; choose Manual to use the slider. Portrait lighting dims the background and brightens you.
- Audio Microphone modes Noise removal: set Background noise suppression to Auto, or High in a noisy room.
On a phone, Zoom’s help lists Portrait lighting but not Adjust for low light. Zoom chooses the noise level for you.
Microsoft Teams
- Before a meeting, select Open device settings on the join screen. Under Video Settings, turn on Adjust brightness. Soft focus smooths your face.
- Settings and more Settings Devices: turn on Noise suppression. It is on unless someone turned it off. During a meeting, it is under More actions Settings Audio settings.
Google Meet
- On a computer: More options Backgrounds and effects Appearance, then turn on Adjust video lighting. On iPhone and iPad: More Settings Adjust video lighting. Some paid plans show Studio lighting instead.
- More options Settings Audio: turn on Noise cancellation. Some plans only: free personal accounts may not have it.
Mac
During a call, open the Video menu in the menu bar (macOS Sonoma or later).
- Studio Light dims the background and lights your face. It needs a Mac laptop with Apple silicon and its own camera. An iPhone 12 or later, used as the Mac’s camera, works too.
- Edge Light lights your face from the edges of your screen. It needs a Mac with Apple silicon and macOS Tahoe 26.2 or later.
- Mic Mode, then Voice Isolation, filters out background sounds. Not every app offers it.
Windows
- Open Start Settings Bluetooth & devices Cameras, choose your camera, and raise Brightness under Basic settings. Some cameras don’t show it.
- Windows Studio Effects adds background blur, eye contact and voice focus. It needs a PC with an NPU, a chip for AI. Portrait light is only on Snapdragon Copilot+ PCs. Open it from the Studio Effects tile in Quick Settings.
iPhone and iPad
During a call, swipe down from the top-right corner to open Control Center. On an iPhone with a Home button, swipe up from the bottom. Tap the controls for your call app, then under Audio & Video choose a Mic Mode. Voice Isolation puts your voice first and blocks the sounds around you.
Check it all before the call
- Sit where you’ll take the call, at the same time of day.
- Open the webcam test and turn off Mirror picture to see what the others see. Check the light and the camera height.
- Make a recording in the mic quality test and play it back.
Test it now
Prepare for a video call
It checks your camera, microphone, speakers and internet, one step at a time. At the end, a report says what to fix.
Getting ready for an online exam with a webcam? It has stricter rules: see the online exam tech check.
Questions people ask
Do I need a ring light?
Usually not. A window in front of you, or a desk lamp near your screen, does the same job. If you buy one, put it behind the camera, at about eye level, facing you.
Will a better webcam fix a grainy picture?
Not if the room is dim. Grain comes from the camera turning up its brightness in low light. Add light first, then test again. A better webcam helps once the light is good and the picture is still soft.
How far should I sit from the camera?
About an arm’s length. Your head and shoulders then fit in the picture, with a little space above your head.
How far should the microphone be from my mouth?
A headset microphone about 2 cm. A desk microphone about 15 to 30 cm, pointed at your mouth. The laptop’s own microphone is as far as the screen, so it hears more of the room.
Why do I look the wrong way round?
Your own picture is shown like a mirror, so it’s easy to move into place. The others see you the other way round. To see what they see, turn off Mirror picture in the webcam test. Or use True mirror in our online mirror.
Should I use my phone instead of my laptop?
It can be, if you stand it up at eye level. Held in your hand, it looks up at you and shakes. To choose, look at both in the webcam test, in the same light, and keep the sharper one.